
Lino Printing on a Budget video!
- Julie Mok
- Apr 10, 2025
- 5 min read
Updated: Sep 14, 2025
On a budget and curious about linocut art ? Looking to expand your art skills, start a new hobby or teach a young person a new activity? Here's a quick guide for beginners on a budget.
What is linocut printmaking?
Lino printing or linoleum art is a cheaper alternative to woodblock art. Both involve the carving of a relief design on a surface. Linoleum which was traditionally used as flooring was found to have good carving qualities, easily accessible and cheap art material.
Lino printmaking gained popularity in the twentieth century and was embraced by German Expressionists, Russian Constructivists, and even Picasso. Nowadays, you can start creating prints at home to make your own gifts, cards, and even fabric designs.
Lino printing on a budget. Materials you’ll need:
1. A fabulous and simple artwork
2. Soft pencil (ideally B)
3. Black sharpie pen or fine tip waterproof pen
4. Tracing paper or carbon paper
5. Lino cutting tool kit - includes linocut tools
6. Lino block (maybe included in the linocut kits)
7. Printmaking ink
8. Printmaking paper
9. Brush
10. Wooden spoon
11. Anti slip surface / bench hook
12. Old cloths for cleaning
Start printmaking:
The most cost-effective way to start is by purchasing a linocut starter kit. These kits typically contain lino cutting tools, a lino block, a roller, and sometimes ink and paper, all of which can be easily found online.

UK outlets or purchase from Amazon
Buy direct from Essdee the market leader lino-cutting tools for beginners. Variety of lino cut kits at affordable prices.
Hobbycraft - basic starter kit with tools and ink
Handprinted UK - various own brand starter kits options with tools and surface blocks.
Amazon UK or Amazon USA - choose from variety of lino printmaking kits from taster to starter packs. Please check your local Amazon supplier.
Warm up exercises
Good stockists will offer a range of cutting blades, from 'v' to 'u' shapes. Follow the printmaking steps below to familarize yourself with these tools and the lino surface by doing some warm-up exercises. Draw a variety of shapes and lines with different thicknesses and lengths on the lino, and use various lino tools to make marks.

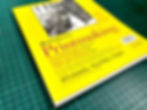
The image above features recommendations from a chapter in Nick Morley's book, ‘Linocut for Artists & Designers.’ This book serves as an excellent introduction for beginners and artists aiming to enhance their skills. Alternatively, you can explore ‘Beginner’s Guide to Linocut’ by Susan Yeates.
See my ‘Goodreads’ blog post for more details.
Printmaking Steps:
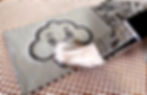
Create or choose your artwork
For beginners, find a simple and bold design. Either choose an image you can copy or draw a simple everyday object. Once you’ve settled on a design, make sure the image size fits your lino block.

Transfer image to lino
With a soft pencil, trace your image onto tracing paper and transfer to the lino block. Or use carbon paper to draw over the outline of the image. Alternatively, draw image directly onto your block.


Tip: Keep in mind that the image you print on paper will be mirrored. To ensure it faces the desired direction, it's advisable to reverse your image before tracing or copying.
Tip: Apart from linoleum, alternative easy-to-carve surfaces may be included in your starter kit. Here are some examples, traditional lino, Japanese vinyl, Essdee soft cut and speedy cut.

Draw over the outline again with black sharpie pen to give you clear lines whilst carving and avoid smudging soft pencil markings (use thin waterproof pen if you have finer lines or more detail).


Prepare carving workspace
Tip: lino cutting tools are sharp. Prepare your cutting work surface by either placing a non-slip mat under the lino block or use an Essdee safeguard. Both will prevent lino block from moving and help with both safety and precision cutting.


Tip: position your non-cutting hand parallel to the carving tool and grip the lino block. Ensure your fingers are not in the cutting path. Hold the carving tool at a 45-degree angle to the surface. Trace your line and carve slowly.


Papers
Pick printmaking paper or card of your choice. Choose a lightweight paper such as pro-art strathmore printmaking paper pad (approx. 143gsm) which is readily available online. Handprinted UK, and Amazon UK. Tip: ink may slide and smudge if you print on standard A4 paper
Roll and Ink
Find a waterproof tray or flat surface to roll out the printmaking ink. Roll evenly to make sure the entire roller is covered in ink. Avoid excessive ink as this will smudge your image. Roll ink over the lino block.
Use specialist printmaking ink available at Handprinted UK, Amazon UK, Essdee UK. Tip: acrylic paint is sticky and dries fast impacting your image.


Burnish and print
Position the paper on top of the inked lino and press down to transfer the image. The most cost-effective method is to use a clean, dry, large wooden spoon. Glide the base of the wooden spoon over the entire paper surface along the lines of the lino. Tip: move the wooden spoon across the surface, avoiding the grooves to prevent smudging the ink.
If you wish to upgrade, above are examples of baren choices (circular disk) speedball metal mesh and Japanese baren.
Prints
Allow a couple of hours for water-based ink to dry. Repeat the process to make multiple prints.

Cleaning
The recommended printmaking inks are water-based, so use a damp cloth to remove the ink from the lino block. Avoid immersing the lino block in water. Clean the surface several times until both the ink and moisture are gone. Allow the block to dry before applying ink again. Store the lino block in a dry area to ensure it can be used repeatedly.
Enjoy lino printing on a budget!
Happy printing!